
5 Ways to Make Comments or Request for Changes in a Contract During Negotiations

When it comes to a written contract, it's typical for one party to offer their “standard contract” to sign. The other party’s task is to then review and comment on the contract before both sides agree to sign.
To put it in another, one side has the burden of drafting the contract (whether they do it themselves or pay a lawyer to do it).
The other side has the burden of reviewing it and asking for changes. In this post, we’ll be covering methods you can use to request for changes or edits in a contract.
Let's say you receive a contract and after reviewing it, you identify a few items that need to be changed or negotiated. Here are the most common ways you can communicate your request for changes with the pros and cons for each:
1. Bulleted list your requested changes in an email. The easiest way to ask for changes is to list them out in an email. For example:

👍 Pros: Easiest and quickest way to ask for changes. Revising language in a contract can be hard work and so you're leaving that work to the other side.
👎 Cons: You're trusting the other side to make the changes the way you want them. You also risk that they don’t make all your changes.
2. Put your comments in the document. Open the actual document and ask for your changes in shorthand in a comment box.
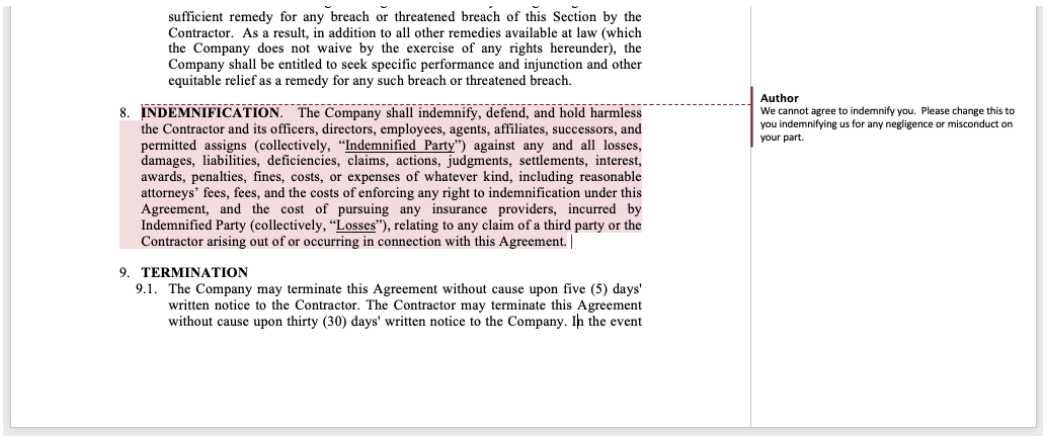
👍 Pros: Another easy way to ask for changes but with a little bit more work. Again, you’re leaving the hard work of actually revising the contract to the other side. But, you're giving a little bit more direction by showing where you want the changes.
👎 Cons: Same as above, except you're doing a bit more work by actually putting the comments into the document.
3. Revise the contract yourself in tracked changes. Open the contract in Word and turn on "tracked changes". Then proceed to change the language of the contract.
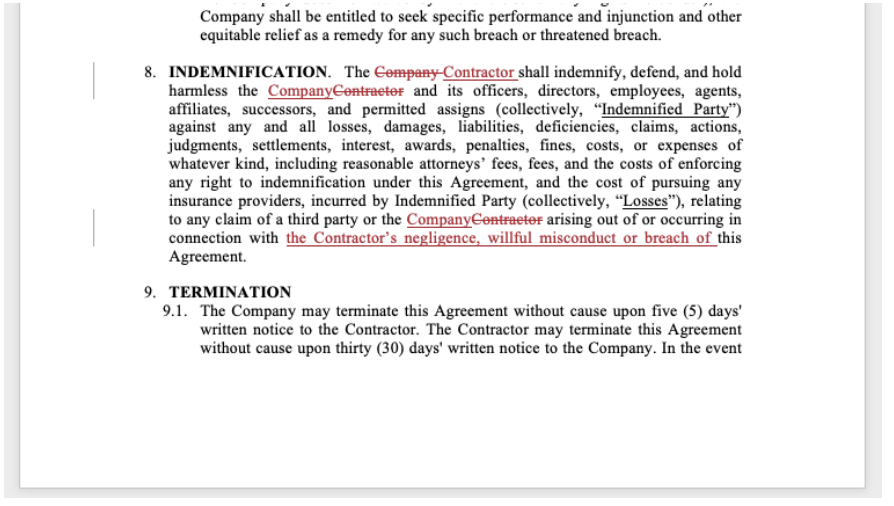
👍 Pros: You are putting down exactly what you want. This can make it more difficult for the other side to avoid any requests for changes.
👎 Cons: It's more work to revise the contract language itself. This may require you to hire a lawyer to help. Also, in tracked changes, the other side can easily “reject” your changes.
4. Revise the contract yourself and send along a redline or blackline. Revise the contract language and then prepare a blackline or redline* to send along with it. A blackline is a separate document that shows the changes that were made.
*(See below for instructions on how to create a blackline with Word.)

👍 Pros: Same as above. Also, since a blackline is a separate document that shows changes, it is not as easy for the other side to “reject” changes by simply pressing a button.
👎 Cons: Same as above plus it can require a couple extra steps to create a redline or blackline rather than doing it in tracked changes.
5. Mark it up by hand. Do it the old-fashioned way! Print the contract and then write your comments by hand with a colored pen.
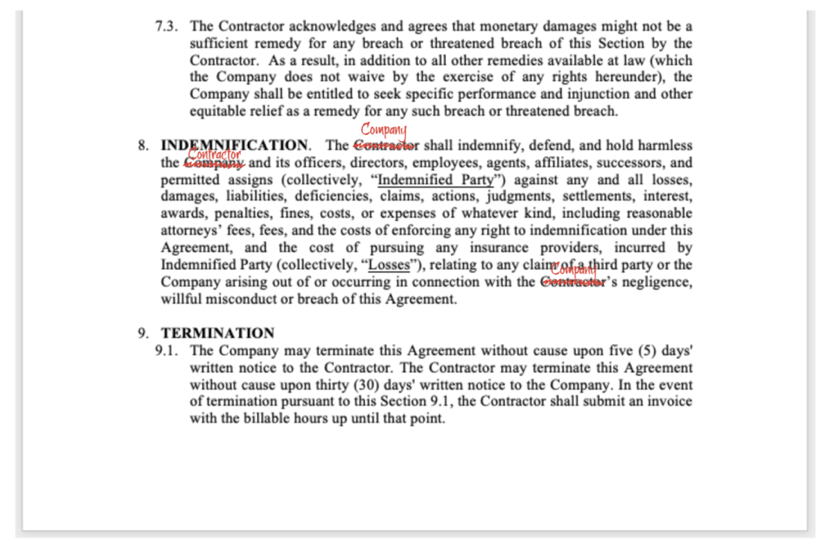
👍 Pros: If you're a person who likes reviewing contracts in hard copy, this might be the easiest way for you.
👎 Cons: You're leaving room for the other side to make mistakes transcribing your handwriting or leave things out.
The right method for any given situation depends on the particular deal and the person that you’re dealing with.
For example:
If you’re dealing with someone who is incredibly busy and you foresee asking them to make changes might delay things … it might be better for you to make the changes to the contract language yourself.
If you are dealing with someone who has an in-house lawyer who is responsible for drafting and negotiating contracts … a bulleted list in an email might be best so you don’t have to hire a lawyer to help you redraft language in the contract.
Whatever method you choose, it’s important that you review the contract carefully before you sign. Things can get left out inadvertently. Make sure that the final product reflects everything that you have agreed to.
* HOW TO CREATE A BLACKLINE IN WORD:
Make sure you have the “original” draft saved somewhere. This is the version that you want to compare with the current draft.
When you are finished with your “current” draft, click on the Review tab. (If you don’t see any tabs, go to View in the menu bar and click Ribbon.
Click on Compare icon (it looks like two stacked documents) and select Compare Documents.
Click on the folder icon next to Original Document and select your “original” draft file.
Click on the folder icon next to Revised Document and select your “current” draft file.
Click OK.
Voila! Your blackline will be created as a separate document. Save it as a PDF and send it with a “clean” version (i.e., Word document with no tracked changes) to the other side.
Disclaimer: This article is for informational and educational purposes only, it is not legal advice. It does not create an attorney-client relationship between you and Lawgood, its founders, or the author. If you need legal advice, you should hire a lawyer.
